7 steps to wire a 3 pin rocker switch panel marine
Wiring a 3-pin rocker switch panel marine use can seem complicated, but with a clear understanding of the wiring process, it can be done in just a few simple steps. This guide will help you wire your 3-pin rocker switch panel in a marine environment, providing a safe and reliable electrical system for your boat.
Step 1: Prepare the materials of rocker switch panel installation
Gather Materials Before starting the wiring process, you will need to gather the necessary materials. These materials include:
- 3-pin rocker switch panel
- Wire connectors (spade or bullet connectors)
- Marine grade wiring (stranded or tinned)
- Marine grade heat shrink tubing
- Wire stripper tool
- Electrical tape
- Screwdriver
Step 2: Plan the Wiring of boat rocker switch panel
Before beginning the wiring process, it is important to have a clear plan in place. This includes determining the location of the boat rocker switch panel, the type of wiring to use, and the size of the wiring that will be needed. It is important to use marine-grade wiring that is designed to withstand the harsh marine environment.
Step 3: Connect the Power Source of rocker switch panel marine
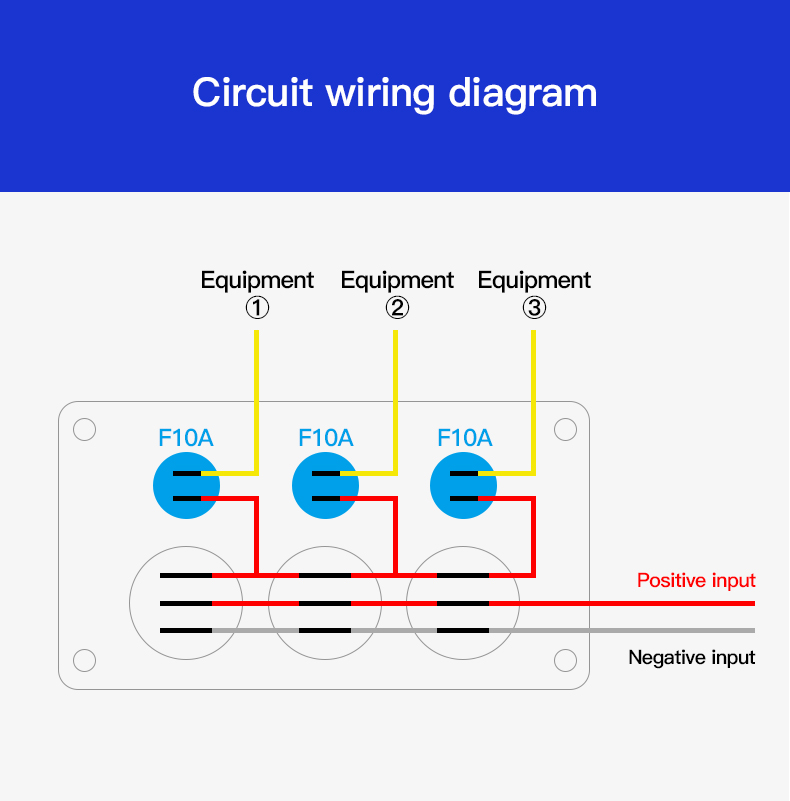
The first step in wiring the 3-pin rocker switch panel marine is to connect the power source. This is typically done by running a positive (red) and negative (black) wire from the battery to the rocker switch panel. These wires should be securely connected to the panel using wire connectors.
Step 4: Connect the Load
You will need to connect the load, which is the device or devices that will be powered by the rocker switch panel. This can be a light, a bilge pump, or any other device that requires power. The load should be connected to the load terminals on the rocker switch panel.
Step 5: Connect the Ground Wire for boat rocker switch panel
The ground wire is a critical component in the wiring process, as it ensures the safety of the electrical system. The ground wire should be connected to the ground terminal on the boat rocker switch panel.
Step 6: Protect the Wiring of rocker switch panel
Once the wiring is complete, it is important to protect the connections from the harsh marine environment. This can be done by covering the connections with heat shrink tubing or electrical tape.
Step 7: Test the System
Once the wiring is complete, it is important to test the system to ensure that it is working properly. This can be done by turning the rocker switch on and off to see if the load is functioning as expected.
Safety Considerations Wiring a 3-pin rocker switch panel in a marine environment requires special attention to safety. The marine environment is harsh and can cause corrosion and other damage to the electrical system. It is important to use marine-grade wiring and connectors that are designed to withstand this environment. Additionally, it is important to properly protect the wiring connections to prevent any damage to the electrical system.
In conclusion, wiring a 3-pin boat rocker switch panel in a marine environment can seem complicated, but with a clear understanding of the wiring process and the right materials, it can be done in just a few simple steps. By following this guide, you can ensure a safe and reliable electrical system for your boat.
llation of suitable panels, and regular.

How to ensure safe use of rocker switch panel in hazardous environments?
When installed in hazardous environments, such as in industrial facilities or on heavy-duty vehicles, ensuring their safe use becomes critical. In such environments, a malfunction or failure of a rocker switch panel can cause significant harm to equipment, personnel, or the environment.
Select & install the rocker switch panel correctly
The selection and installation of rocker switch panel is a critical step in ensuring their safe use in hazardous environments. Some of the factors to consider when selecting and installing these panels include:
Enclosure material – the material of the enclosure should be suitable for the environment in which the rocker switch panel will be used. For example, in corrosive environments, stainless steel or aluminum enclosures may be necessary.
Environmental protection – the boat rocker switch panel should provide adequate protection against the elements, such as moisture, dust, and chemicals.
Size and placement – the size and placement of the panel should be such that it can be easily accessible and operated in the intended environment.
Mounting – the rocker switch panel marine should be securely mounted to prevent it from becoming dislodged or damaged in hazardous conditions.
Wiring – the wiring and connections of the panel should be properly installed and maintained to minimize the risk of electrical hazards.
Maintenace and test the boat rocker switch panel
Maintenance and testing of boat rocker switch panel to ensure the safe use of rocker switch panel in hazardous environments, it is important to regularly maintain and test these panels. This includes:
- Inspection – regularly inspect the panels for signs of damage or wear and tear, and repair or replace them as necessary.
- Cleaning – clean the rocker switch panel marine and their enclosures to remove dust and other debris that can interfere with their proper operation.
- Testing – test the rocker switch panel regularly to ensure that they are functioning properly and to identify any potential issues before they become dangerous.
- Documentation – maintain detailed documentation of the maintenance and testing of the panels, including any repairs or replacements, to ensure that they remain in compliance with safety standards.
Conclusion Ensuring the safe use of rocker switch panel in hazardous environments is critical to prevent electrical hazards and minimize the risk of harm to equipment, personnel, and the environment. This requires compliance with relevant safety standards, proper selection and insta

Conclusion Ensuring the safe use of rocker switch panel in hazardous environments is critical to prevent electrical hazards and minimize the risk of harm to equipment, personnel, and the environment. This requires compliance with relevant safety standards, proper selection and insta
